Summer Is Ours!

Be Healthy! Be Happy!


Leave a comment

NEWS!

Hey you guys!

To those that are following this blog, you guys made my day! Thank you!

And to the rest, please look this blog through 🙂

Well, I guess you guys are wondering: “Why don’t you have new posts?” “Why is it taking so long to start?” etc.

Some of my friends and family members are not quite ready since our graduation was yesterday! Yes! Class of 2013! So please be patient. On the “About” page I had highlighted or emphasized on the start date: Monday, June 17. 

More posts will be added next week!

Thank you! ❤


Leave a comment

Get Sleek, Sexy Arms!

ADD THIS TO YOUR ROUTINE!

Did you know?

Your shoulders and upper back tend to carry less fat than the rest of your body, so the right arm exercises can give this area a nearly instant makeover, says Ramona Braganza, a celebrity trainer who has worked with stars such as Anne Hathaway and Jessica Alba. Braganza’s upper-body workout, below, hits every major muscle and will help stabilize your shoulder joints, improve your posture, and build that strong, toned look you’re after.

Materials You Need And What You Need To Do:

For this arm workout, use five-to eight-pound weights, perform 15 to 20 reps of each exercise and go from one move to the next with little or no rest between. Do two or three sets three times a week.

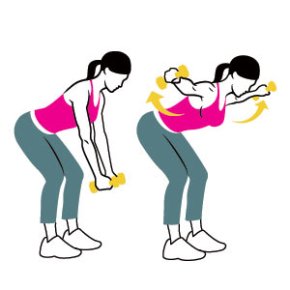
Move 1: Reverse Fly

Grab a pair of dumbbells and stand with your feet hip-width apart and your knees bent. Bend forward at the hips and let your arms hang straight down from your shoulders, palms facing. Raise both arms out to the sides as you squeeze your shoulder blades together. Return to start. That’s one rep.

Image

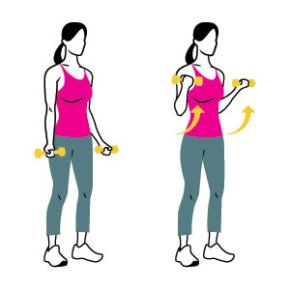
Move 2: Biceps Curls

Hold a pair of dumbbells at your sides, palms facing forward, and keep your back straight and chest up. Without moving your upper arms, bend your elbows and curl the weights toward your shoulders. Slowly lower the weights back to the starting position, straightening your arms completely. That’s one rep.

Image

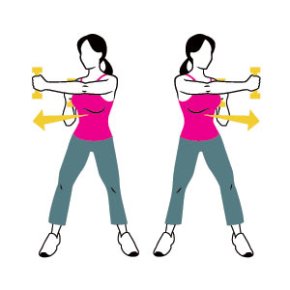
Move 3: Dumbbell Cross Jab

Stand with your feet a bit wider than hip width and knees slightly bent. Hold the dumbbells at chest height with elbows bent and palms facing each other. Extend your left arm across your body until the weight is in line with your right shoulder. As you return to start, repeat with the right arm. That’s one rep.

Image

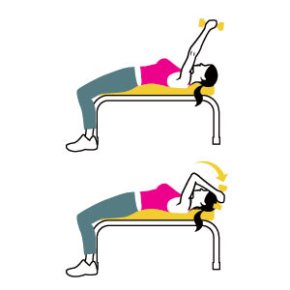
Move 4: Lying Triceps Extension

Lie face-up on a bench and hold a pair of dumbbells above your head, arms straight and palms facing each other. Without moving your upper arms, bend your elbows to lower the dumbbells until they are at either side of your head. Pause, then lift the weights back to the starting position. That’s one rep.

Image

Take what she commented into consideration:

Barbara Capers
“First and foremost, exercise by itself will NOT get rid of jiggly arms. If you have jiggly arms, you can do all these great exercises for your arms, and a few months later, you’ll have nice, firm arms… underneath all the fat that’s STILL there. You need to focus on lowering your body fat percentage first.

I’m having a lot of success losing the excess fat following the weight loss program at: http://WomensFitness.in/. I still have a few more pounds to lose to get that flat stomach I want, but that thought alone keeps me motivated.

Remember, doing arm exercises without reducing your body fat first will only result in greatly developed arms, hidden behind a mountain of fat. Spot reduction does not work!

Credits To: http://www.womenshealthmag.com/fitness/arm-workout-0


Leave a comment

7 Most Effective Exercises

No. 1: Walking

Why it’s a winner: You can walk anywhere, anytime. Use a treadmill or hit the streets. All you need is a good pair of shoes.

How to: If you’re just starting to walk for fitness, begin with five to 10 minutes at a time. Add a few minutes to each walk until you get to at least 30 minutes per walk. Add time to your walks before you quicken your pace or add hills. 

No. 2: Interval Training

Why it’s a winner: Interval training lets you boost fitness, burn more calories, and lose weight. The basic idea is to vary the intensity within your workout, instead of going at a steady pace.

How to: Whether you walk, run, dance, or do another cardio exercise, push up the pace for a minute or two. Then back off for two to 10 minutes. Exactly how long your interval should last depends on the length of your workout and how much recovery time you need. A trainer can fine-tune the pacing.. Repeat the intervals throughout your workout.

No. 3: Squats

Why it’s a winner: Squats work several muscle groups — your quadriceps (“quads”), hamstrings, and gluteals (“glutes”) — at the same time.

How to: Keep your feet shoulder-width apart and your back straight. Bend your knees and lower your rear as if you were sitting down in a chair. Keep your knees right over your ankles.

*Practice with a real chair to master this move. First, sit all the way down in the chair and stand back up. Next, barely touch the chair’s seat before standing back up. Work up to doing the squats without a chair, keeping the same form.*

No. 4: Lunges

Why it’s a winner: Like squats, lunges work all the major muscles of your lower body. They can also improve your balance.

How to: Take a big step forward, keeping your back straight. Bend your front knee to about 90 degrees. Keep weight on your back toes and drop the back knee toward the floor. Don’t let the back knee touch the floor.

*Extra Challenge: Try stepping not just forward, but also back and out to each side, with each lunge.*

No. 5: Push-Ups

Why it’s a winner: Push-ups strengthen your chest, shoulders, triceps, and core muscles.

How to: Facing down, place your hands slightly wider than shoulder-width apart. Place your toes on the floor. If that’s too hard, start with your knees on the floor. Your body should make a straight line from shoulders to knees or feet. Keep your rear-end muscles and abs engaged. Bend your elbows to lower down until you almost touch the floor. Lift back up by pushing through your elbows, Keep your torso in a straight line throughout the move.

Too Easy? To Hard?: If you’re new to push-ups you can start doing them by leaning into a kitchen counter. As you get stronger, go lower, using a desk or chair. Then you can move onto the floor, starting with your knees bent. For a challenge, put your feet on a stair, bench, or couch while keeping good form.

No. 6 Crunches: Method A

Start by lying on your back with your feet flat on the floor and your head resting in your palms. Press your lower back down. Contract your abdominal muscles (abs) and in one smooth move, raise your head, then your neck, shoulders, and upper back off the floor. Tuck in your chin slightly. Lower back down and repeat.

Method B

You can also do crunches with your feet off the floor and knees bent. This technique may keep you from arching your back. It also uses your hip flexors (muscles on your upper thighs below your hip bones).

Mastering Crunches

Keep your neck in line with your spine. Tuck in your chin so it doesn’t stick out. Breathe normally. To keep chest and shoulders open, keep your elbows out of your line of vision.

No. 7: Bent-Over Row

Why it’s a winner: You work all the major muscles of your upper back, as well as your biceps.

How to: Stand with your feet shoulder-width apart, bend your knees, and bend forward at the hips. Engage your abs without hunching your back. Hold weights beneath your shoulders, keeping your hands shoulder-width apart. Bend your elbows and lift both hands toward the sides of your body. Pause, then slowly lower your hands to the starting position.

Mastering Bent-Over Rows

First, do this move without weights so you learn the right motions. If you have trouble doing bent-over rows while standing up, support your weight by sitting on an incline bench, facing backward.

Credits To: Web MD. Reviewed by Varnada Karriem-Norwood, MD on April 16, 2012


1 Comment

7 Risky Exercises and Better Bets

Some exercises are great and some you thought are good but end up actually weighing you down even more. Here are 7 types of exercises are not as effective as we all thought it would be and 7 solutions to those types of exercises.

No. 1: Lat Pull-down Behind the Head

The problem: Only people with very mobile shoulder joints can keep their spines straight enough to do this exercise properly. So the move — done wrong — can lead to shoulder impingement or worse, a tear in the rotator cuff. And if the bar hits the back of the neck, it could injure cervical vertebrae.

A Safer Lat Pull-down

On the pull–down machine, lean back a few degrees, use a wider–than–shoulder grip, and bring the bar down in front of your body to the breastbone, pulling shoulder blades down and together. Contract your abdominals to stabilize the body, and avoid using momentum to swing the bar up and down. The lat pull–down works the muscles of the upper back.

No. 2: Military Press Behind the Head

This shoulder move, in which you lift weights or a barbell up and down behind the head, can cause the same problems as the lat pull–down behind the head.

A Safer Military Press

A safer shoulder alternative: When doing the military press, keep the bar or dumbbells in front of your head. Stand with the weight no lower than the collarbone and keep your upper body upright. The exercise can also be done seated. Always sit straight against a back support, and keep the natural curve in your spine, with upper back and glutes pressed to the chair.

No. 3: Upright Row

The problem: Pulling weights, a barbell, or a weighted cabled bar up under your chin is a big no-no because it can compress the nerves in the shoulder area, impinging the shoulder.

Safer Alternative to the Upright Row

Instead of doing an upright row, work your shoulders with a front or lateral shoulder raise, lifting weights out to the front or side of the body.

No. 4: Leg Press with Cramped Knees

From a reclining position, you push the plate up and bring it down in this common exercise to work the quadriceps, hamstrings, and glutes. The problem comes when you bend your legs too far — past a 90-degree angle — which can hurt your back and knees.

Leg Press: Safer Moves

If you want to do a lying leg press, keep your butt from rotating off the back of the machine, and don’t bend past 90 degrees at the knee.

No. 5: Squats on the Smith Machine

The problem: The bar on the machine doesn’t give, which can force the body into risky positions. Plus, people tend to put their feet farther in front of their bodies when doing squats on the machine, which makes matters worse.

Squats: A Safer Alternative

It’s not necessary to use weights when doing a squat, but if you keep good form, adding weight will intensify the move. Standing straight with your feet shoulder-width apart, slowly lower your body, back straight. Move the hips back as if you are going to sit in a chair. Try to maintain your weight directly over your feet, keeping heels on the floor. Lower yourself to about a 90 degree bend in the knee. Slowly return to a standing position.

No. 6: Bad Form on Cardio Machines

The problem: Hunching over or using a death-grip on the handrail cheats your body and can throw off your alignment, jarring your spine, shoulders, and elbows.

Better Technique on Cardio Machines

Don’t set the incline or resistance so high that it causes you to hang on to the machine too tightly. Use a natural gait with a light grip. For a more challenging workout, hold on lightly with one hand and move the other arm, switching arms periodically. And save the reading for after your workout so you can focus on good form.

No. 7: Exercises for Spot Reduction

People who do strengthening and toning exercises in an effort to trim fat from a certain area — thighs, hips, stomach, or arms — have the wrong idea. Although these exercises can help firm muscles, if the targeted area still carries an extra layer of fat, it won’t look much different. You can’t isolate fat loss to one part of the body.

Best Ways to Reshape Your Body

Cardiovascular exercise will torch calories, but resistance training is a big part of the equation if you want to burn fat. Boosting your muscle mass increases your metabolism, so you burn more calories all the time, even when you’re not working out.

Suggestions

1.  Do You Need a Weight Belt?

Too many people wear weight belts too often. Unless you have a back injury or other medical reason — or are lifting a lot of weight — the weight belt may let your core muscles slack off. And you need your core muscles all the time in everyday life.

The solution: Back off the weight belt unless it’s necessary.

2. Can Bad Shoes Trip Up Your Workout?

Even if you’re doing everything else right, your efforts can be undermined by improper footwear. Working out with the wrong shoes increases pounding on the joints, and can lead to injuries like plantar fasciitis or tendonitis.

Shoe Solution

The key, experts say, is to choose a shoe that is specific to your activity and that suits your particular foot. They recommend shopping at stores specializing in athletic shoes, where you can seek advice from a knowledgeable salesperson. And don’t forget to replace your shoes when they show signs of wear.

Credit To: Web MD. Reviewed by Andrew Seibert, MD on September 09, 2011


Leave a comment

Scrambled Eggs with Toast and Grapefruit!

104953

Servings: 2

Ingredients:

  • Cooking oil spray
  • 1/4 pound smoked chicken breast, cut into cubes
  • 1/4 cup egg whites
  • Salt and pepper, to taste
  • 1/2 cup shredded nonfat cheddar cheese
  • 4 slices whole-grain bread, toasted
  • 2 grapefruit, cut in half and seeded

Instructions:

  1. Coat a nonstick skillet with cooking spray and heat the skillet.
  2. Add the cubed chicken and egg whites.
  3. Season with salt and pepper and cook for 2 minutes.
  4. Add the cheese and cook until the cheese is melted.

To serve: Spoon the scrambled eggs onto plates and serve with toast and grapefruit.
Recipe provided by The 5-Factor Diet (Meredith Books, 2006) by Harley Pasternak, M.Sc., with Myatt Murphy.


Leave a comment

Eat Healthier Desserts!

images (7)

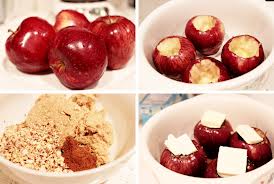
Baked Apples

Here are the ingredients you’ll need:

· 1 medium apple (I love the taste of Honey Crisp apples)
· 1/4 cup water
· 1/4 tsp. granulated sugar
· 1/8 tsp. cinnamon
· 1/4 cup Fat Free Reddi-wip

Direction: 

  1. To make this yummy dessert, first preheat the oven to 375 degrees.
  2. Core the apple by taking a knife and cutting a circle around the core, and then pull it out.
  3. Place the apple in a casserole dish and pour water over the it.
  4. Then sprinkle it with sugar and cinnamon.
  5. Bake in the oven until the apple is tender, for about 45 minutes.
  6. Top the apple with fat-free Reddi-wip.
  7. Enjoy!

Credit to Seventeen Magazine
“Nutrition Tips From The Biggest Loser Expert!” Seventeen. N.p., n.d. Web. 22 Apr. 2013.


Leave a comment

Makeover Your Grocery List!

images (6)

When you get hungry and have no healthy foods in your house, it can be tempting to reach for something unhealthy, like junk food. Fix this by keeping a few staple items in your house, so you can reach for those instead of that bag of chips.

You can use these items in so many different ways and in tons of dishes:

Lean protein

  • I love the Applegate Farm brand of deli meats, such as turkey and chicken slices. Not only do they taste delicious, but they also don’t have any preservatives!

Low-Fat Cheeses And Yogurt

  • The brand Horizon makes great organic and hormone-free cheeses. And for yogurt, always look for 0% fat Greek yogurt, like Fage or Chobani.

Whole-Wheat Pasta

  • As long as the pasta you buy says “made with 100% whole wheat or whole grain,” you’re good to go! If you’re a picky eater and don’t love how whole grain pasta looks, try Dreamfields, or Ronzoni Smart Taste—both look and taste just like white pasta!

Frozen Fruits and Veggies

  • Always keep these handy! I love mixing frozen fruits with ice-cold non-fat milk or yogurt for a mid-day treat, and frozen veggies can be heated up for a quick, healthy stir fry dinner—just throw in chicken and brown rice.

Seventeen Magazine
“Nutrition Tips From The Biggest Loser Expert!” Seventeen. N.p., n.d. Web. 22 Apr. 2013.


Leave a comment

Crave for a sundae? Make it!

There are lots of ways to make dessert healthy! If you make
fruit the main part of the dish, you can make a dessert that doesn’t have tons
of calories. One I especially love is a play on the classic sundae.

Directions:

  1. Peel a banana
  2. top it with a few teaspoons of fat-free cool whip
  3. two teaspoons of chocolate syrup
  4. some nuts (for a little crunch and added protein!)
  5. fresh fruit like blueberries, strawberries, or raspberries

This “sundae” has just enough chocolate to satisfy your sweet tooth, but the fresh fruits make it a yummy and healthy choice—you won’t even miss the ice cream or candy toppings!

Seventeen Magazine
“Nutrition Tips From The Biggest Loser Expert!” Seventeen. N.p., n.d. Web. 22 Apr. 2013.

images (4)


Leave a comment

Feel ENERGIZED!

Raspberry Yogurt Popsicle

Ingredients:

  • 2 cups of milk
  • yogurt
  • 2 tablespoons honey, add more to taste
  • 1 pint fresh raspberries

Directions:

  1. In a large bowl, stir together the yogurt and honey.
  2. Taste and add more honey if you’d like.
  3. Put 1 or 2 raspberries in the bottom of the popsicle molds.
  4. Pour a bit of the yogurt mixture over the berries, then alternate adding berries and more yogurt mixture until you fill the molds. The raspberries are light enough so they’ll suspend in the yogurt wherever you place them.
  5. Freeze for at least 4 hours before serving.
  6. GO CRAZY

Seventeen Magazine suggested to “dip the top in honey, then granola.”


Leave a comment

Get Glowing!

You may love spending time under the sun, that doesn’t mean your skin does! Catching rays will ruin your complexion, but peaches are loaded with vitamins A and C, which help you stay dewy and smooth all over.
Ingredients:

  • 4 to 5 peaches
  • 2 tsps. of honey
  • 2 tsps. of lemon juice

Directions:

  1. Lightly blend the peaches so there will still be chunks
  2. Mix slightly all together the ingredients with a utensil because you might over blend
  3. Put all in a clear plastic cup(s) or in Popsicle molds
  4. Put in the freezer and wait for about 3 to 4 hours
  5. Take it out and enjoy!

Credit To: Seventeen Magazine
Joel Horowitz
Alyse Levine, R.D.

images (2)